Draw 10 Sticks and Circle
Despite the mythical prowess of Leonardo da Vinci, about of u.s. mere mortals can't draw a mathematically perfect circumvolve by hand – only it's possible to do with GIMP, even if you can't depict at all with a pencil.
Now before you start getting cheeky, I'm going to simply openly admit that *I* am ane of those people who can't describe past hand at all. I've come to the graphics globe through photography and design rather than the more traditional fine arts, so please forgive my complete lack of drawing skills 😉
GIMP doesn't accept something as elementary every bit a Circle tool like you tin can find in Inkscape or Illustrator, but that doesn't hateful yous've got to channel the legendary (and probably apocryphal) skill of a Renaissance human just to draw a mathematically perfect circle.
Quick Navigation
- Two Quick Methods to Draw a Circle in GIMP
- ane. The Paintbrush Method
- two. The Ellipse Select Method
- What Nearly The Paths Tool?
- A Last Discussion
Two Quick Methods to Describe a Circle in GIMP
Here are the two fastest and simplest methods to describe a circumvolve in GIMP:
i. The Paintbrush Method
Footstep ane: Select the Paintbrush tool from the toolbox, or use the shortcut P.
Pace two: In the Tool Options panel, ready the Size pick to whatever size you lot want your circumvolve to exist, then set up the Hardness selection to 100.
Footstep iii: Click once anywhere on your paradigm to depict your perfect circle.
2. The Ellipse Select Method
Step 1: Switch to the Ellipse Select tool from the toolbox, or use the shortcut East.
Step 2: Hold down the Shift key to lock the selection into a circle, and click and drag to create your circular selection.
Step 3: Switch to the Bucket Fill tool using the toolbox or use the shortcut Shift + B, and click anywhere within your pick to fill it with the currently-selected foreground colour.
I can't choose which of these two methods is easier, so information technology's up to you to cull which one fits all-time with your personal mode and workflow.
The Paintbrush method might be slightly faster, but the Ellipse Select method gives you a lot of extra flexibility – and y'all can reposition information technology if you lot don't place it perfectly right away.
What Virtually The Paths Tool?
In a couple of the other cartoon tutorial posts, I've recommended using the Paths tool to create reusable stencils for your drawings. You can definitely exercise the aforementioned affair for drawing circles, simply information technology's not nearly as constructive because ensuring that your path is really a perfect circle tin quickly go a tedious and time-consuming process.
Instead of wasting your fourth dimension fiddling effectually with Bezier curve handles, you can use a modified version of the Ellipse Select method to create a reusable path for you! This pick is definitely the almost time-consuming, but it besides gives yous a perfectly circular stencil you can utilize for a range of purposes.
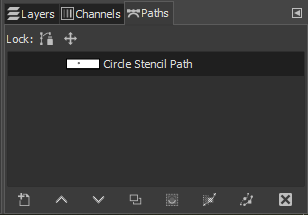
Follow the start two steps as described higher up to create a perfectly circular selection, but when you get to Footstep 3, do non use the Bucket Make full tool. Instead, look for the Paths panel, commonly located in the lesser right corner of the GIMP interface.
It'south located in a tabbed window inside the Layers panel, but if information technology's not visible you lot tin bring the Layers panel back using the shortcut Ctrl + Fifty. You can too recover the panel by opening the Windows card, selecting Dockable Dialogs, and clicking Layers.
Along the bottom of the Paths panel, find the push button labeled Selection to path (see the highlighted button in a higher place). This will convert your selection into a set of Bezier curves automatically, without you having to fiddle effectually trying to get all the handles positioned properly
Optionally, yous can concur downward the Shift key while you click Pick to path to go access to some advanced settings that command how GIMP creates your new paths, but as yous can meet below, they're not kidding when they say 'advanced'. For our purposes, the default settings are fine.

GIMP will summate the shape of your selection and depict a path, which appears as a new entry in the Paths console named Selection by default, just you can rename it to something easier to call back similar Circle Stencil.
Cancel the Ellipse Select marquee by pressing Ctrl + Shift + A (Command + Shift + A on a Mac), or open the Select menu and choose Select None. You tin can then switch to the Paths tool using the toolbox or by pressing the shortcut B to see how GIMP has constructed it.

With the Paths tool active, select your path in the Paths panel and hold down the Alt key (use the Option key on macOS) to move information technology around your image every bit needed.
In one case you're happy with its location, information technology's time to apply a stroke or fill up to the path to create your actual circle. In the Tool Options panel, you'll see that the Paths tool has a few extra features that make this longer procedure worth information technology for the extra flexibility.

If you lot want to fill up your circle completely, cull the Fill Path pick. GIMP will testify you a simple dialog box that lets you lot cull between filling your circle with the currently selected foreground color or the currently selected design in the Patterns panel (located in a tabbed dock next to the Brushes panel).
If y'all'd rather have an outlined circle, choose the Stroke Path selection. This has a few more options than the Fill Path route, merely that extra flexibility lets yous set all the characteristics of your line, even creating your outline with a pattern.

Only most importantly, you tin also fix the stroke to use any of GIMP'south castor tools from the trusty paintbrush to the Dodge/Burn tool used for local contrast adjustments. This lets you create perfect circles that wait hand-painted thanks to the brush effects – and once you've got the stencil prepare up the first time, it'southward to move them around and reuse them!
A Final Word
I often say that there are many ways to achieve the aforementioned result in the world of digital graphics, but few examples showcase the fact more finer than something basic like drawing a circle in GIMP. It would be nice if in that location was a simple Circle tool, but you'll have to wait to a programme like Inkscape if you desire things to exist that neat and easy.
Practice you have a favorite method for cartoon circles in GIMP that I've left out of this guide? Permit me know in the comments and I'll take a look!
Source: https://thegimptutorials.com/how-to-draw-circle/
0 Response to "Draw 10 Sticks and Circle"
Post a Comment